Building a really smart Jabber chatbot with Dialogflow
Have you heard of Dialogflow?
Dialogflow (previously known as api.ai) is a conversational agent manager. Basically, you can see Dialogflow as a back-office were to manage an NLP engine.

As an admin, you can create intents that represent a suite of similar “user says”. Under the hood, Dialogflow provide an AI (Natural Language Processing) that learns to match user inputs (called “user says”) with intents depending on the context, in order to provide the more logical/appropriate response. It could be an actual answer, called a “speech”, as it can be an action. For example : starting a job, running a command, etc.
Dialogflow has recently been bought by Google in order to provide a user friendly interface to configure and manage Google Home applications / agents. It comes with a lot of pre-made integrations such as Twitter, Slack or Facebook Messenger. But there is no integration provided for a Jabber server.
The purpose of this blog post is to create a real Jabber chatbot that on top of Dialogflow. We will write it in Go !
All the source code can be found on the MrBot Github repository.
Welcome MrBot
MrBot will be our chatbot.
Once running, MrBot will connect to a Jabber server and join one or more room. Then, MrBot will listen all the messages sent in the room and only catch the ones that begin with "@mrbot”.
MrBot will catch those direct mention messages and send them to Dialogflow. Dialogflow will then take those messages and match them to a corresponding intent we've defined. Then, Dialogflow will return the corresponding response depending on the context and the intent configuration.
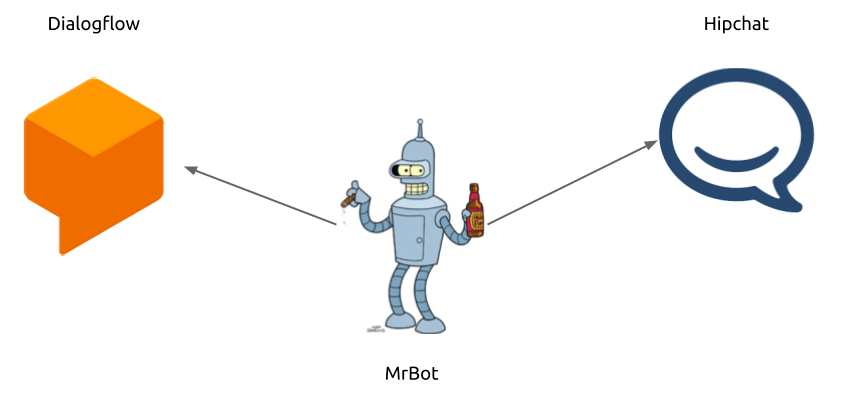
To be able to do that, MrBot will use the Dialogflow REST API.
For the purpose of this post (but also because it is what I use on a daily basis), our Jabber server will be an Hipchat server.
Our Go Bot will use dep for dependencies and Viper for configuration management.
At the end, MrBot will run on an Heroku instance.
MrBot under the hood
A little word about architecture first. Our bot logic will be placed in several Go files at the root of the project. Clients for Jabber and Dialogflow will be placed in a pkg directory (see bellow).
At the end, we will have a directory structure similar to this :
├── Gopkg.lock
├── Gopkg.toml
├── Makefile
├── README.md
├── bot.go
├── mrbot.go
└── pkg
    ├── dialogflow
    └── hipchat
From XMPP to Dialogflow
First of all, we need to know how to connect to the Hipchat server and how to call Dialogflow.
Hipchat server connection
Hipchat servers are simple Jabber servers following the XMPP protocol. Connecting MrBot to our Hipchat server, means using several required informations :
- url : the server url
- port : the server port
- username : a username to connect with
- password : the username associated password
We also need a XMPP client. I choose to use the github.com/adams-sarah/go-xmpp client.
Here is the source code of our Hipchat client located in a pkg/hipchat/client.go
package hipchat

import (
    "fmt"
    "log"
    "time"

    "github.com/adams-sarah/go-xmpp"
)

//Client represents an XMPP client
type Client struct {
    url      string
    port     int
    username string
    password string
    Client   *xmpp.Client
    alive    bool
}

//NewClient creates a new client using xmpp.Options
//and set the bot status as available using a keep alive go routine
func NewClient(url string, port int, username, password string) *Client {
    c := &Client{
        url:      url,
        port:     port,
        username: username,
        password: password,
    }

    opts := xmpp.Options{
        Host:     fmt.Sprintf("%s:%d", c.url, c.port),
        User:     fmt.Sprintf("%s@%s", c.username, c.url),
        Password: c.password,
        Debug:    true,
        Resource: "bot",
    }
    // Initialize client
    hipchat, err := opts.NewClient()
    if err != nil {
        log.Println("Client error:", err)
    }

    c.Client = hipchat

    c.setAvailable()

    return c
}

func (c *Client) setAvailable() {
    c.alive = true
    go c.keepAlive()
}

func (c *Client) setOffline() {
    c.alive = false
}

//Send a presence message every 30 seconds
func (c *Client) keepAlive() {
    for c.alive {
        c.Client.SendOrg(" ")
        time.Sleep(30 * time.Second)
    }
}
The keepAlive() method let us having MrBot marked as available in the room.
Talking to Dialogflow
Dialogflow expose a REST API where you can send queries. A query can be associated to a “user says”. Google provide Dialogflow client library for Java, NodeJs and Python. Unfortunately, there are no client for Go. But the Dialogflow API reference is quite simple.
The only thing we need to call the Dialogflow API is :
- The API URL
- A token that can be used to authenticate calls made.
For the purpose of our bot, we will only write a very simple Dialogflow API client that post queries. There are other endpoints available and there is probably the need of a complete Dialogflow client written in Go. But… right now we will focus on MrBot.
Find bellow the Dialogflow client source code.
pkg/dialogflow/client.go :
package dialogflow

const BaseURL = "https://api.dialogflow.com/v1"

//Client represent a Dialogflow client
type Client struct {
    Url string
    Token string
}

//NewClient create and return a simple Dialogflow client
func NewClient(token string) *Client {
    c := Client{
        Url: BaseURL,
        Token: token,
    }

    return &c
}
pkg/dialogflow/query.go :
package dialogflow

import (
    "bytes"
    "encoding/json"
    "fmt"
    "io/ioutil"
    "log"
    "net/http"
)

//Answer represent a response returned by the Dialogflow AI to a "user says'.
type Answer struct {
    Result struct{
        Speech string `json:"speech"`
    } `json:"result"`
}

//Query call Dialogflow in order to send a "user says" to the AI and return the speech
//the AI choose to answer.
func (c *Client) Query(query string) string {

    var payload = []byte(fmt.Sprintf(`
    {
        "lang": "fr",
        "query": "%s",
        "sessionId": "12345"
    }
    `, query))

    req, _ := http.NewRequest("POST", fmt.Sprintf("%s/query",c.Url), bytes.NewBuffer(payload))
    req.Header.Set("Authorization", fmt.Sprintf("Bearer %s", c.Token))
    req.Header.Set("Content-Type", "application/json")

    client := &http.Client{}
    resp, err := client.Do(req)
    if err != nil {
        log.Println(err)
    }

    defer resp.Body.Close()

    body, _ := ioutil.ReadAll(resp.Body)

    var a Answer
    err = json.Unmarshal([]byte(body), &a)
    if err != nil {
        log.Println(err)
    }

    return a.Result.Speech
}
Reading messages from a Room
Now that Mr Bot is connected to the Jabber server, we want it to start listening messages in a room.
Joining a room
This is where we need our HipChat client to help us join a room. For that, we are going to create a Room struct and a Join method on the Room. This way, we will be able a create Rooms associated to a client and join the Rooms on demand :
client := NewClient(...)
room := client.NewRoom(...)
room.Join()
This way of working with rooms will makes things easier if we want to read available rooms (or rooms where we want Mr Bot to be active) through a configuration file
We can easily imagine an array of rooms in which we only have to iterate to create each room and then Join them
Let's create a pkg/hipchat/room.go file :
package hipchat

import (
    "github.com/adams-sarah/go-xmpp"
)

//Room represent an XMPP Room (a group chat)
type Room struct {
    client   *xmpp.Client
    roomJid  string
    fullname string
    roomType string
}

//NewRoom creates a new room.
//parameters are :
//* The Jabber room ID
//* The name (fullname) used in the room.
func (c *Client) NewRoom(roomJid, fullname string) *Room {
    return &Room{
        client:   c.Client,
        roomJid:  roomJid,
        fullname: fullname,
        roomType: "groupchat",
    }
}

//Join makes the bot join the room using the fullname specified
func (r *Room) Join() {
    r.client.JoinMUC(r.roomJid, r.fullname)
}

func (r *Room) Send(message string) {
    r.client.Send(xmpp.Chat{To: r.roomJid, From: r.fullname, Type: "groupchat", Text: message})
}
Listening messages
We still need to introduce a domain notion : messages.
We will see later that an XMPP server is very close to a stream of messages. It means that each time we will read an input coming from the server, we will want to create a message from what has been read.
Our messages will look like this :
pkg/hipchat/message.go:
package hipchat

//Message represent an xmpp chat message
type Message struct {
    To   string
    From string
    Type string
    Text string
}

//NewMessage return a new Message
func NewMessage(to, from, messageType, text string) *Message {

    return &Message{
        To:   to,
        From: from,
        Type: messageType,
        Text: text,
    }
}
Last things before putting all things together : we need to read messages from a room on an HipChat server.
In the XMPP protocol, reading messages means connecting to the server and wait for the next message. So, messages are read one by one. But still… all that looks a lot like a stream of messages and, with a good use of Go routines, it should be easy to make our source code run exactly like if we were streaming messages from the sever.
In order to reproduce the streaming behaviour, we will use a chan where messages are going to be pushed in and read from. Then, we will add a Stream() method to our Jabber client that will start reading messages and put them in the channel.
A good way to create streaming API is to create a stream struct containing a chan from where we will read objects we stream and a boolean that tells us if the stream is active.
Here is our streaming API bellow.
pkg/hipchat/streaming.go :
package hipchat

import (
    "log"
    "strings"

    xmpp "github.com/adams-sarah/go-xmpp"
)

//Stream represents a chat message stream.
type Stream struct {
    client *xmpp.Client
    C      chan *Message
    run    bool
}

func (c *Client) newStream(mentionname string) *Stream {
    stream := Stream{
        client: c.Client,
        C:      make(chan *Message),
    }

    stream.start(mentionname)
    return &stream
}

func (s *Stream) start(mentionname string) {
    s.run = true
    go s.loop(mentionname)
}

func (s *Stream) loop(mentionname string) {
    defer close(s.C)
    for s.run {
        message, err := s.client.Recv()
        if err != nil {
            log.Fatal(err)
        }

        if chatMsg, ok := message.(xmpp.Chat); ok {
            //check only direct mention messages
            if strings.HasPrefix(chatMsg.Text, "@"+mentionname) {
                m := NewMessage(chatMsg.To, chatMsg.From, chatMsg.Type, chatMsg.Text)
                s.C <- m
            }
        }
    }
}

//Stream start a new stream that listen message containing
//a reference (using "@") to the mentionname specified
func (c *Client) Stream(mentionname string) (stream *Stream) {
    return c.newStream(mentionname)
}
Putting all together
Now that we have build our infrastructure related packages (API for third party services) the only things lefts are :
- Defining our bot and representing it with a domain object;
- Defining our bot workflow.
Bot definition
In a domain point of view, our bot only need to do a few things :
- Join a room;
- Start listening messages;
- Respond to messages when they mention the bot.
Here is our bot file : bot.go
package main

import (
    "github.com/seblegall/mrbot/pkg/hipchat"
    "github.com/seblegall/mrbot/pkg/dialogflow"
)

//Bot is a robot
type Bot struct {
    hipchat *hipchat.Client
    room    *hipchat.Room
    dialog *dialogflow.Client
}

//NewBot creates a new bot using an hipchat client and set a room for the bot to join.
func NewBot(client *hipchat.Client, room *hipchat.Room, dialog *dialogflow.Client) *Bot {
    bot := &Bot{
        hipchat: client,
        room:    room,
        dialog: dialog,
    }

    return bot
}

//Join make the bot join his room.
func (b *Bot) Join() {
    b.room.Join()
}

//ListenAndAnswer make the bot listen for message that mention (using "@")
//the bot and try to respond to it
func (b *Bot) ListenAndAnswer() {

    go func(b *Bot) {
        stream := b.hipchat.Stream(mentionname)

        for m := range stream.C {
            b.Answer(m)
        }
    }(b)
}

//Answer makes the bot respond to a given message.
//This is where answer rules are defined.
func (b *Bot) Answer(m *hipchat.Message) {
    b.room.Send(b.dialog.Query(string(m.Text)))
}
Working with our bot
Everything is ready now ! A little bit of configuration management and that's all !
In oder to make our bot being 12 Factor App compliant we will use environnement variables for configuration.
Viper is a great tool to work with any kind of configurations (files, env, flags, etc.) so we will use it.
Another cool thing we will had is a graceful shutdown on Ctl+c keys press.
Once those things correctly managed, our workflow is really simple :
- Create a new client for our Jabber server;
- Create a new client for Dialogflow;
- Create a new bot;
- Connect our bot to our Jabber client and Dialogflow client;
- Make our bot join a room;
- Tell our bot to start listen and respond to messages.
Here is our main program mrbot.go
package main

import (
    "os"
    "os/signal"
    "sync"
    "strings"

    "github.com/seblegall/mrbot/pkg/hipchat"
    "github.com/spf13/viper"
    "github.com/seblegall/mrbot/pkg/dialogflow"
)


const (
    hipChatJabberURL  = "chat.hipchat.com"
    hipChatJabberPort = 5223
    fullname = "Mr Bot"
    mentionname = "mrbot"
)

var (
    //Hipchat
    username          string
    password          string
    roomJid           string

    //Dialogflow
    dialogToken string
)

func main() {
    setConfig()

    hipchat := hipchat.NewClient(hipChatJabberURL, hipChatJabberPort, username, password)
    room := hipchat.NewRoom(roomJid, fullname)
    dialog := dialogflow.NewClient(dialogToken)
    bot := NewBot(hipchat, room, dialog)
    bot.Join()
    bot.ListenAndAnswer()
    waitForCtrlC()
}

func setConfig() {
    //hipchat configuration
    viper.SetEnvPrefix("mrbot")
    viper.AutomaticEnv()
    viper.SetEnvKeyReplacer(strings.NewReplacer(".", "_"))

    //Hipchat configuration
    username = viper.GetString("hipchat.username")
    password = viper.GetString("hipchat.password")
    roomJid = viper.GetString("hipchat.roomJid")

    //Dialogflow configuration
    dialogToken = viper.GetString("dialogflow.token")

}

func waitForCtrlC() {
    var wg sync.WaitGroup
    wg.Add(1)
    var sig chan os.Signal

    sig = make(chan os.Signal, 1)
    signal.Notify(sig, os.Interrupt)
    go func() {
        <-sig
        wg.Done()
    }()
    wg.Wait()
}
As you can see, we use a string replacer when reading environnement variables : viper.SetEnvKeyReplacer(). It means that all “_” will be replace by “.". And by default, Viper uppercase configuration keys when trying to read env var.
Here is an example for .env configuration file (automatically read at runtime) :
MRBOT_HIPCHAT_USERNAME="175921_5350262"
MRBOT_HIPCHAT_PASSWORD="password"
MRBOT_HIPCHAT_ROOMJID="175921_myroom@conf.hipchat.com"
MRBOT_DIALOGFLOW_TOKEN="xxxxxxxxxxxxxxxx"
Here we are ! MrBot is now running and rely on Dialogflow to respond to messages.

PS : With great power comes great responsibility.. Now that you have a working robot relying on a AI, don't forget to take take about the 3 law of robotic.